For many years almost all snowmobiles were put together in the same way. It didn't matter what factory it came from , when you opened the hood the pieces were all in the same place. In recent years there has been a big push to make the machines lighter and more compact. This has resulted in a lot of changes in the layout and arrangement of the chassis and drive train parts.
The red arrow in the first photo is pointing to the cover over the brake disc on a newer Ski Doo Rev XP machine. This ones happens to have a 550 fan cooled engine, but all the Rev chassis machines have the brake in this location. I have seen a few of these get stuck from a build up of snow and ice around the brake rotor. While riding fine snow can blow in on the hot brake rotor and melt, when you stop for a coffee break it cools off and freezes. When you try to take off the machine won't move because the brake is frozen in a block of ice. If you have one of these keep an eye on it. Make sure you have the correct size Torx wrench in your tool kit to get the cover bolts off.
This particular machine is in the shop to get the brake rotor and caliper replaced. Someone drove the machine around with the parking brake set and the brake heated up so bad that everything was destroyed. This is the second time I have seen this happen this year!
Here is the new brake caliper/drive shaft bearing mount. As part of the effort to save weight and package everything smaller Ski Doo has made the bearing mount part of the brake caliper. The bearing sits in the large opening, and the four smaller holes bolt the assembly to the side of the tunnel.
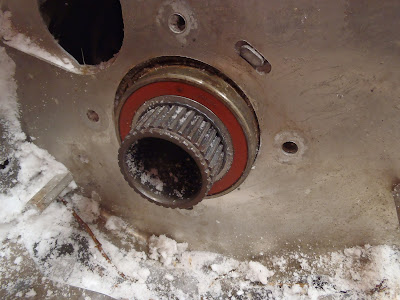
This is the bearing and the end of the drive shaft where it sticks out of the tunnel. In the old days almost every machine used the same 1" bearings for the drive shaft and the jack shaft. As you can see in this photo the drive shaft is hollow and uses a large diameter bearing.
Before installing the new bearing mount I heated it up with an electric heat gun. This causes the metal to expand and increase the size of the hole that the bearing fits in. On many bearing mounts heating like this can increase the size enough to eliminate any pounding or pressing to install the bearing.
The brake line is connected to the caliper with a banjo bolt. Make sure you install it with two copper crush washers, one on each side of the fitting. Once the line is connected the air must be bled out. See this post for info on how to do that.
Here is the new brake all assembled and waiting for the cover. Remember if your machine feels a little sluggish make sure you don't have the parking brake set.


Thank you very much for the hint on heating the caliper/drive shaft bearing mount. I had a similar brake meltdown and it made the job of pulling the old part off and putting the new one on quite a bit easier.
ReplyDeleteThanks for sharing the hints and techniques on how to deal with brakes. But if you have struggles in repairing with your brakes no matter how hard you try, I recommend brakes-4-less.com to help you repair it. It's also very affordable. brake repair mt pleasant sc
ReplyDelete